you will need:
a digital camera
an empty wrapping paper tube
cute kids (lol)
basic paint program
solid color sheets or a solid color bare wall.
hang up your sheet, and take pictures of your child in front of it, in different poses, holding the empty wrapping paper roll...like this...
then open the photo in your paint program.
(I have corel paintshop pro, but there are plenty of other programs that will do)
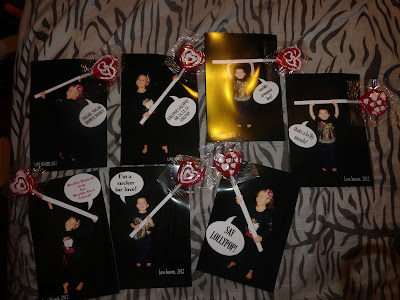
In corel, i use the clone tool to replicate the sheet to cover the wall and floor, then you use the crop tool to crop the photo to 4x6 in size. using the color change tool and touchup brush i changed the color of the roll to white. then using the auto shapes you can add a callout cloud with a clever text, and finish the bottom with a "love *** 2012"
in a traditional paint program, you probably wont have all the tools listed above. Your best option would be to zoom in really close to the wrapping paper roll, and using a white paint brush in a small size slowly fill in over the roll. you can then resize and crop your photo. Then using the circle/oval draw tool you can draw a callout cloud of your own size/shape and use the text tool to fill it in. and use the regular text tool to finish the bottom signature.
additionally if you cannot figure out the cropping tools, most photo printing sites such as CVS, Walgreens, Walmart etc offer a cropping tool online that you can crop before sending the photos for printing so you can be sure they are the correct fit.
PRINT & DECORATE:
print the photos out in 4x6 size either on photo paper or cardstock, and use a hole puncher to make a hole at the end of the roll, which will be the stick. by lollypops of your choice and insert the stick into the hole and secure with a piece of tape on the backside.
p.s if you want to skip the editing process you can use a light background and a white pvc pipe, this way you dont have to color change and you can just write on your finished product with a sharpie ;)
SOME OF THE SAYINGS I USED WERE:
"thats a lol'ly muscle"
"im a sucker for love"
"worlds biggest pop for worlds best friend"
"worlds strongest boy"
"say lollypop"
"lollypop, lollypop, oh la, la, la lollypop!"
"sugar sugar, honey honey"
HERE ARE MY FINISHED VALENTINES!
IF YOU MAKE THESE PLEASE SHARE YOUR INPUT! THANKS!!
NEW CREATIVE TIP IM THINKING OF: if you use clear tape to tape two wrapping paper tubes together (width wize not length wize), they will be double the width. then after printing punch 2-3 holes connected together at the end, and insert a chocolate dipped spoon decorated with small candies of your choice and wrapped in clear plastic wrap or a lollipop bag. you could write "spoon" or "candy" themed qoutes instead of lollypop themed. I HOPE TO HAVE AN EXAMPLE TO SHARE SOON!

NEW CREATIVE TIP IM THINKING OF: if you use clear tape to tape two wrapping paper tubes together (width wize not length wize), they will be double the width. then after printing punch 2-3 holes connected together at the end, and insert a chocolate dipped spoon decorated with small candies of your choice and wrapped in clear plastic wrap or a lollipop bag. you could write "spoon" or "candy" themed qoutes instead of lollypop themed. I HOPE TO HAVE AN EXAMPLE TO SHARE SOON!


No comments:
Post a Comment